> For the complete documentation index, see [llms.txt](https://docs.nifty.ai/llms.txt). Markdown versions of documentation pages are available by appending `.md` to page URLs; this page is available as [Markdown](https://docs.nifty.ai/crosslisting/photo-editing-and-management.md).
# Photo Editing and Management
Good photos sell items. Nifty gives you free editing tools plus an **AI Studio** — background removal in any color, ghost mannequin, flat lay, shadows, and AI models — so your listings stand out without leaving Nifty.
### Where to find it
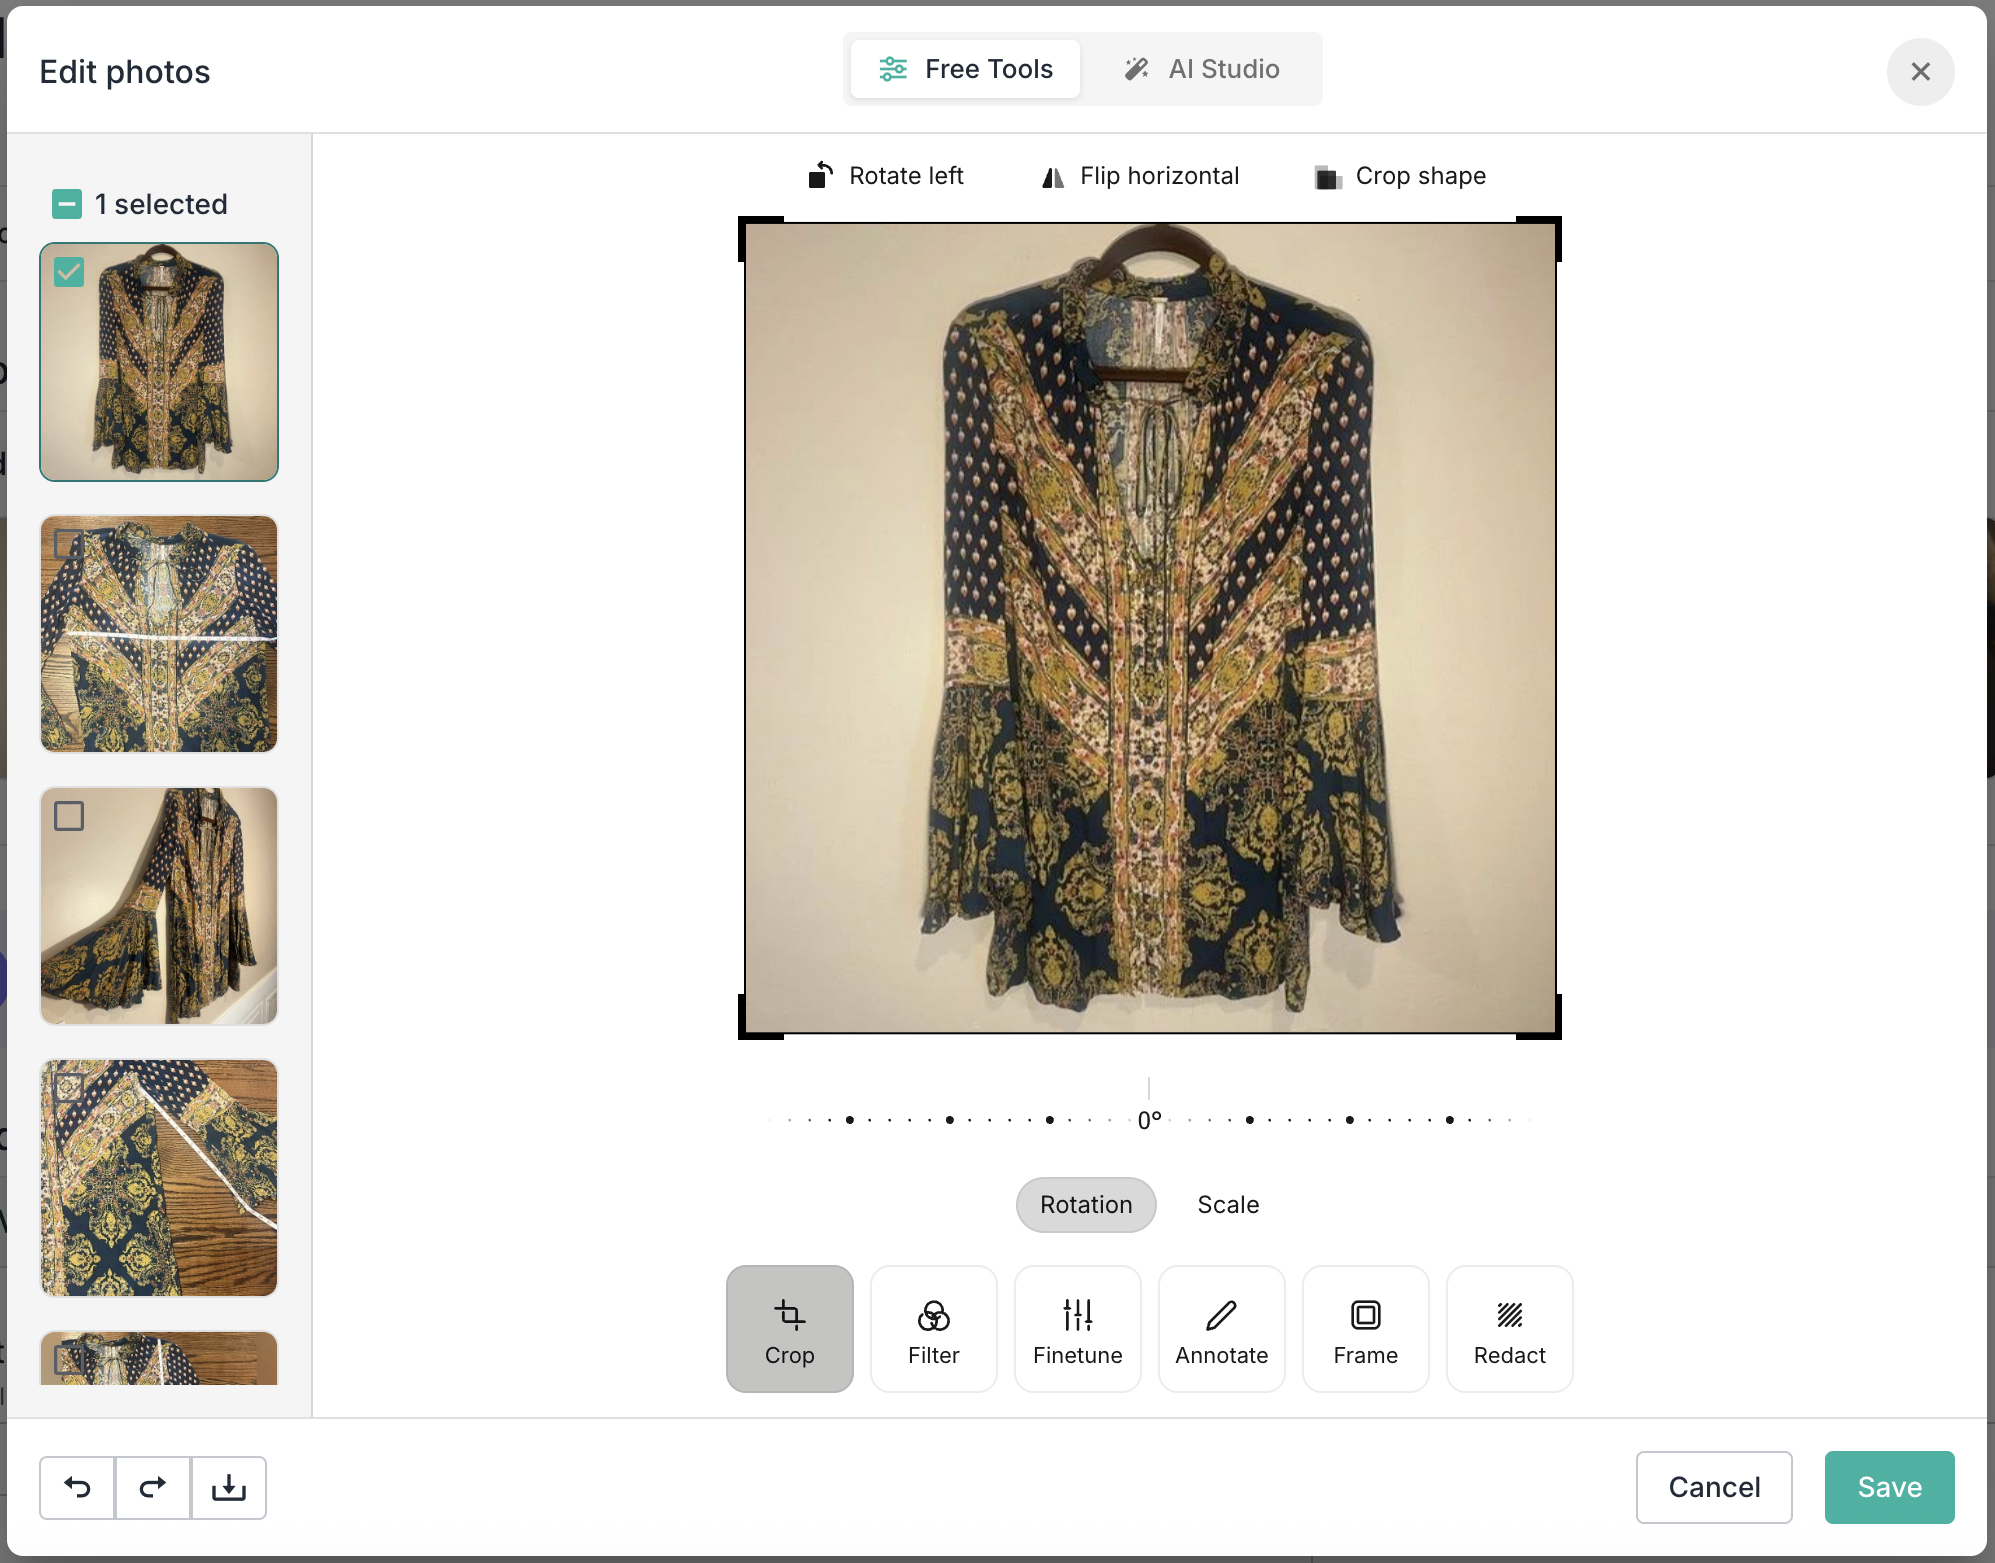
Go to the [**Inventory Manager**](/inventory-management/inventory-manager.md) and open an item in the **Listing form** (see [Creating and Editing Items](/crosslisting/creating-and-editing-items.md)). Click any photo to open the **Edit photos** dialog.
The dialog has two modes, switched with the toggle at the top:
* **Free Tools** — free, manual tools (crop, filter, and more).
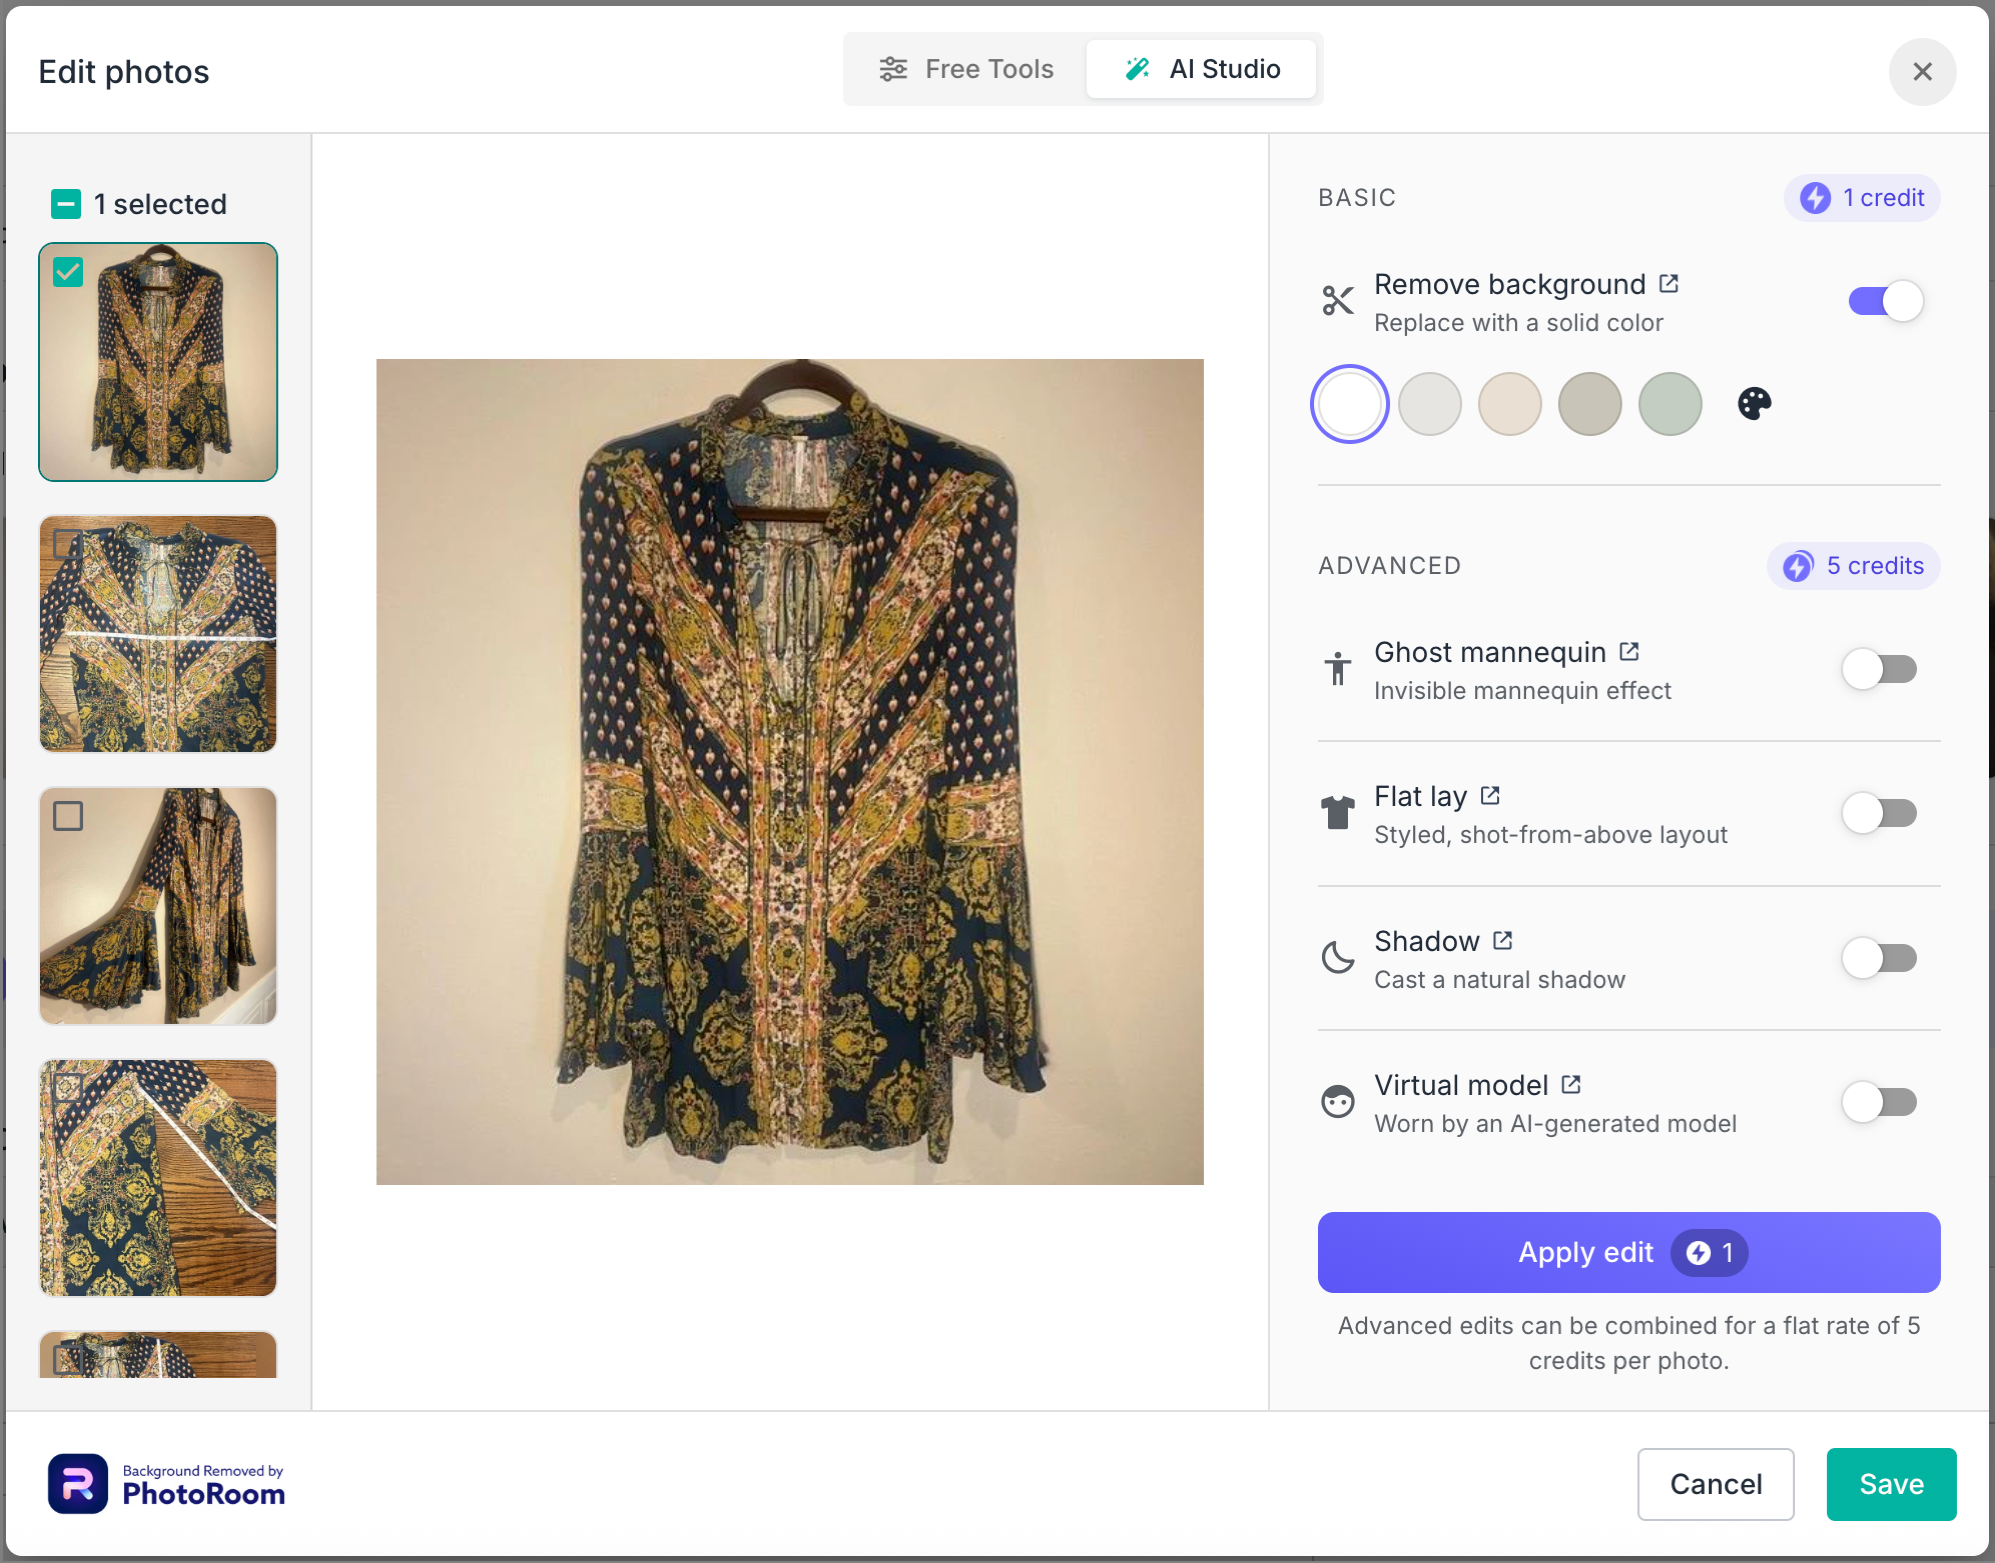
* **AI Studio** — AI-powered edits like background removal and virtual models. These edits use [**Smart Credits**](/crosslisting/smart-credits.md).
### Free Tools
Manual editing tools are available at no cost and don't use [**Smart Credits**](/crosslisting/smart-credits.md):
| Tool | What it does |
| -------- | ------------------------------------- |
| Crop | Trim edges or reframe the shot |
| Filter | Apply preset adjustments |
| Finetune | Adjust brightness, contrast, and more |
| Annotate | Overlay with arrows, shapes, or text |
| Frame | Add a border around the edges |
| Redact | Blur sensitive information |
| Rotate | Fix orientation |
| Flip | Produce a mirror image |
Free edits apply to one photo at a time.
### AI Studio
Switch to **AI Studio** to apply AI edits powered by [Photoroom](https://www.photoroom.com/). Select one photo or several at once, choose your edits, then click **Apply edit** — Studio processes every selected photo together.
AI Studio edits are grouped into **Basic** and **Advanced**.
#### Basic: Remove background
Removes the cluttered background and replaces it with a clean, solid color.
1. Turn on **Remove background**.
2. Pick a background color — **White** (default) or a custom color.
3. Click **Apply edit**.
**Cost:** 1 **Smart Credit** per photo.
#### Advanced: AI edits
Advanced edits use generative AI to restyle your product shot. They include background removal automatically, and you can combine several at once for a single flat rate.
| Edit | What it does |
| --------------- | -------------------------------------------- |
| Ghost mannequin | Invisible mannequin effect for worn apparel |
| Flat lay | A styled, shot-from-above layout |
| Shadow | Casts a natural shadow under the item |
| Virtual model | Shows the item worn by an AI-generated model |
**Cost:** a flat **5 Smart Credits** per photo, no matter how many Advanced edits you combine.
A few rules keep results looking right:
* **Background removal is automatically applied** with any Advanced edit, so you don't pay the Basic credit on top.
* **Ghost mannequin** and **Flat lay** can't be used together — pick one.
* **Virtual model** generates a full scene with its own AI background, so it can't be combined with any other edit (including background removal).
#### Virtual model: Model, Scene, and Pose
When you turn on **Virtual model**, three options appear so you can steer the generated photo. Each defaults to **Auto** (or **Random**), letting the AI choose — but setting the model in particular will help ensure you're happy with the result.
| Option | What it controls |
| ------ | ------------------------------------------------------------------------------------------------ |
| Model | Which AI model wears the item — pick to match the intended look (for example women's vs. men's). |
| Scene | The background and setting, from a plain studio to a beach, street, café, and more. |
| Pose | How the model stands — standing, walking, seated, over-the-shoulder, and others. |
{% hint style="warning" %}
**AI results aren't refundable.** As soon as you click **Apply edit**, your photos are sent to Photoroom and the credits are spent immediately — the credit is not refunded even if you revert to the original. If an edit fails, the credits for those failed photos are automatically refunded.
{% endhint %}
### Per-marketplace photo selection
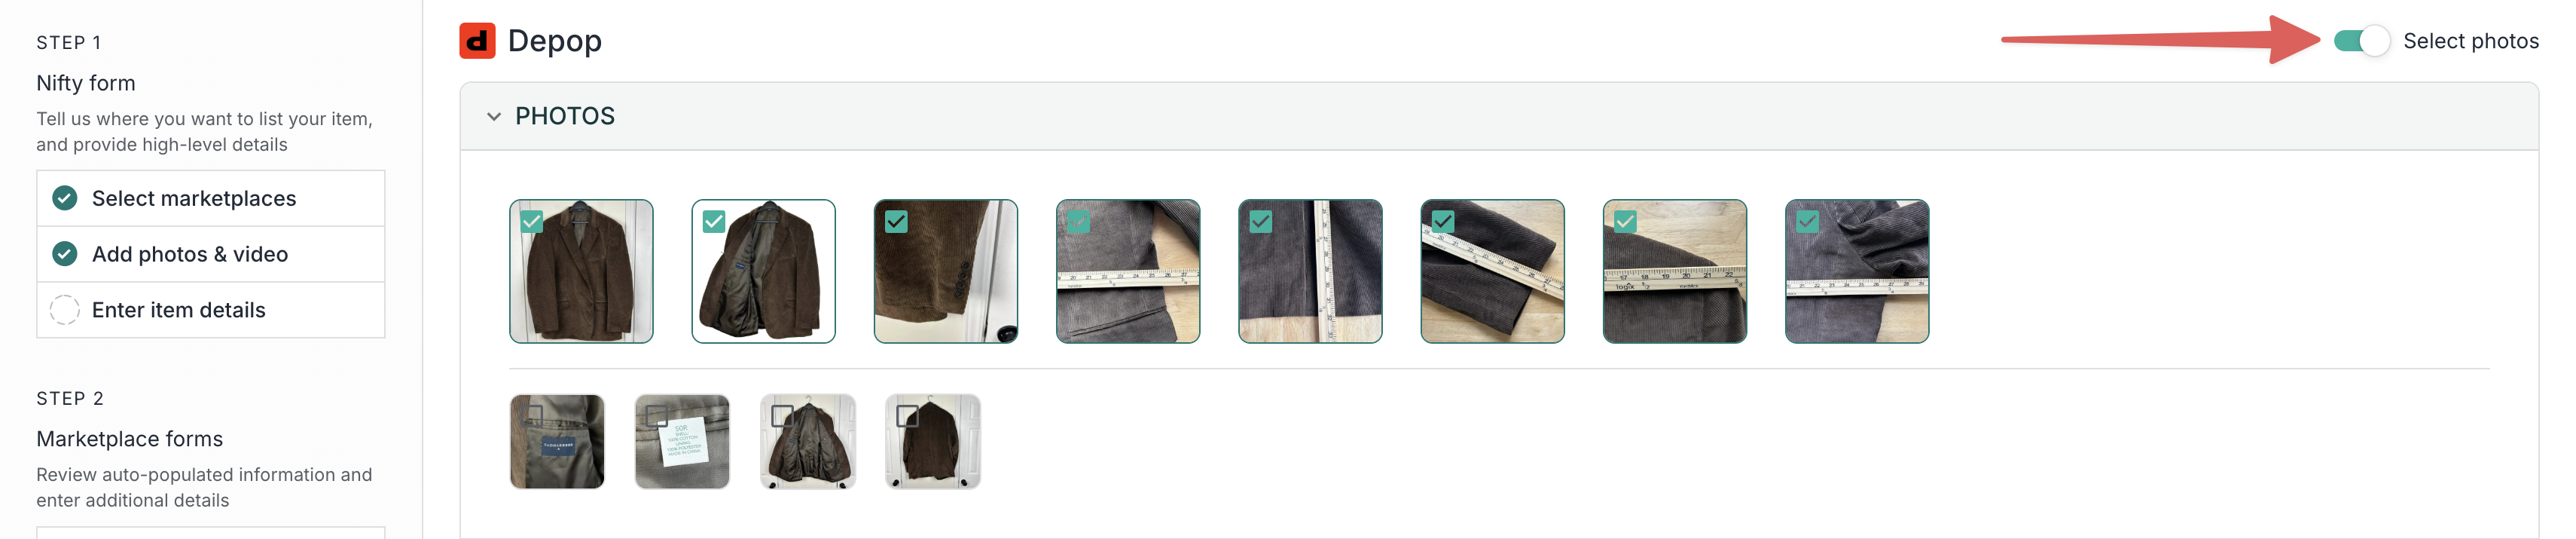
You can choose different photos or a different photo order for each marketplace.
#### When creating a listing
1. Add your photos at the top of the form as normal.
2. For each marketplace, click **Select photos** to update the selection or order.
3. When you publish, Nifty respects the per-marketplace choices.
This is useful when:
* One marketplace has a photo limit (Depop allows fewer than eBay)
* A certain photo works better as the cover on one platform
* You want to exclude a photo from a specific marketplace
{% hint style="info" %}
**Note:** If you don't customize photos per marketplace, Nifty will take as many as we can for the marketplace. For example, for Depop we'll take the first 8 photos, as only 8 are allowed.
{% endhint %}
#### When editing an existing listing
When you reopen the **Edit item** form, Nifty does not preserve the per-marketplace view. Instead, you'll see a representative collection of photos at the top.
**Important behavior:**
* If you don't change the photos while editing, your listing photos stay exactly as they were on each marketplace.
* If you do make changes, you'll see a green **Changes detected** indicator.
When you see the **Changes detected** indicator, you may want to reselect photos per marketplace before saving — otherwise your changes apply uniformly.
### What you can't do
| Limitation | Details |
| ------------------- | ---------------------------------------------------------------------------------------------- |
| Bulk free edits | AI Studio edits can be applied to multiple photos at once; Free Tools work one photo at a time |
| Edit the AI result | You can't manually adjust what the AI kept, removed, or generated |
| Refund after revert | Reverting an AI Studio edit doesn't refund the credit — processing already occurred |
---
# Agent Instructions
This documentation is published with GitBook. GitBook is the documentation platform designed so that both humans and AI agents can read, navigate, and reason over technical content effectively. Learn more at gitbook.com.
## Querying This Documentation
If you need additional information that is not directly available in this page, you can query the documentation dynamically by asking a question.
Perform an HTTP GET request on the current page URL with the `ask` query parameter, and the optional `goal` query parameter:
```
GET https://docs.nifty.ai/crosslisting/photo-editing-and-management.md?ask=&goal=
```
`ask` is the immediate question: it should be specific, self-contained, and written in natural language.
`goal` is optional and describes the broader end goal you are ultimately trying to accomplish on behalf of the user. GitBook uses it to tailor the answer towards what is most useful for that goal.
The response will contain a direct answer to the question and relevant excerpts and sources from the documentation.
Use this mechanism when the answer is not explicitly present in the current page, you need clarification or additional context, or you want to retrieve related documentation sections.